
Table of Contents
- Why On-Site Coordination Matters for Dust-Controlled Restoration
- Construction Dust Control Methods: The Foundation of Coordination
- Drywall Sanding Dust Control During Active Work
- Occupied Building Renovation Dust Control and Communication
- On-Site Restoration Coordination Checklist for Every Phase
- Containment and Pressure Management During Restoration
- Verification and Measurable Performance Standards
- Frequently Asked Questions
Last Updated: October 16, 2026
Why On-Site Coordination Matters for Dust-Controlled Restoration
On-site coordination for dust-controlled restoration is the difference between a project that protects your space and one that spreads contamination everywhere. When drywall work, surface restoration, or renovation happens inside an occupied building, dust doesn’t stay contained without a plan. It travels through air ducts, settles on furniture, and disrupts tenants or residents. Strong coordination prevents that.
At IJS Limited Construction, we’ve learned that dust control fails when teams treat it as an afterthought. The real work happens before the first tool touches a wall. You need clear roles, equipment positioned correctly, and communication that actually reaches everyone in the building. Without that, you’re managing chaos instead of preventing it.
Here’s what changes when you coordinate properly:
- Dust stays in the work zone instead of spreading to other floors or rooms
- Occupied spaces stay functional during active work
- Workers know exactly what containment is active and why
- Project timelines stay on track because you’re not stopping to clean up contamination
- Client trust stays high because disruption is minimal
The best projects we’ve managed shared one thing: someone owned the dust-control plan from day one. Not as a checkbox. As an active, daily responsibility.
Construction Dust Control Methods: The Foundation of Coordination
Dust control starts with understanding what you’re up against. Construction dust control methods vary by the type of work, the building’s age, and whether people are occupying the space. Different methods work for different situations.
Water-based suppression is the simplest approach. Mist systems or spray equipment apply moisture to dust sources before they become airborne. This works well for demolition, grinding, or sanding in spaces where water won’t damage finishes. The downside: it’s temporary.
Chemical suppressants bind dust particles so they don’t travel. These are useful for haul roads, outdoor work areas, or spaces where you can’t use water.
Containment barriers and negative pressure systems isolate the work area entirely. Plastic sheeting, temporary walls, and air handlers create a sealed zone. Dust stays trapped. This is essential in occupied buildings where zero dust transfer is the goal.
Fixed dust-control systems are permanent installations. They’re expensive upfront but deliver consistent, long-term suppression. Mobile equipment gives you flexibility for smaller jobs or multiple locations.
The real coordination challenge is matching the method to the actual conditions:
- Active demolition needs aggressive suppression (misting + containment)
- Finishing work needs clean air (negative pressure + HEPA filtration)
- Outdoor work needs surface treatment (water or suppressants)
- Occupied spaces need zero tolerance (containment + air quality monitoring)
Choose based on the work type, duration, and who’s in the building. One method rarely solves everything.
Drywall Sanding Dust Control During Active Work
Drywall sanding dust control is where most projects fail because the dust is fine, travels fast, and settles everywhere. Drywall dust is different from construction debris. It’s microscopic.
The solution requires three layers: containment, air handling, and worker protection.
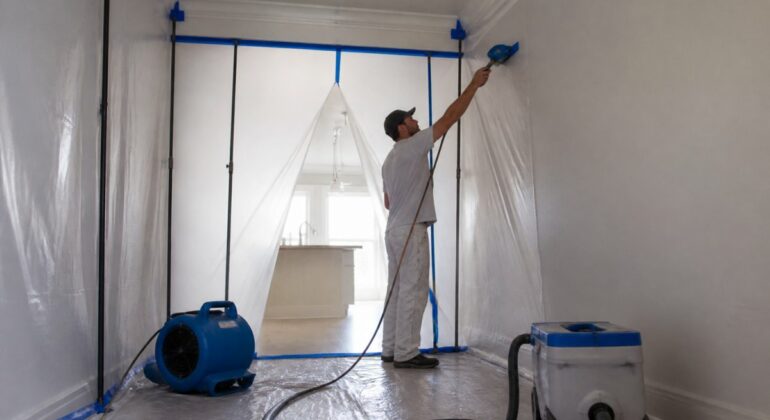
First, seal the work zone. Use plastic sheeting on all doorways, vents, and openings. Tape seams so air can’t slip past. This stops the bulk of dust from leaving the room.
Second, control the air pressure. Set up a negative pressure system with an air handler and HEPA filter. The system pulls air OUT of the work zone and exhausts it outside.
Third, protect workers. Respirators rated for fine dust (N95 or better) keep sanding dust out of lungs. Provide them, require them, and verify fit.
During active sanding, mist the drywall compound lightly before sanding. Wet sanding produces far less airborne dust. It’s slower, but containment works better.
Here’s what active sanding looks like in a coordinated project:
- Containment barriers installed before tools arrive
- Air handler running and tested before first sanding stroke
- Workers briefed on respirator use and dust zones
- Moisture application scheduled into the work plan
- Air quality checked daily with a simple dust monitor
- Cleanup happens inside the containment, not in the hallway
The mistake most teams make: they sand first, then try to contain the dust. By then, it’s already in the HVAC system and every adjacent room. Start with containment. Then sand.
Occupied Building Renovation Dust Control and Communication
Start with a pre-work briefing. Meet with building occupants, facilities managers, and tenants. Show them the containment setup. Explain the schedule.
Post clear signage. Mark containment zones with visible barriers and signs. Label which floors or areas are affected. Include emergency contact information for disruptions.
Coordinate timing with building operations. Schedule heavy dust work during off-hours if possible. If not, notify occupants 48 hours in advance. Give them a window, not a surprise.
Monitor air quality in occupied spaces. Use a simple dust monitor to check adjacent rooms. If dust levels rise, shut down work and adjust containment. This shows occupants you’re serious about protection.
Respond to complaints immediately. If someone reports dust, dust smell, or air quality concerns, investigate within hours, not days. Document what you find and what you fixed. Transparency builds trust.
Communication checklist for occupied buildings:
- Pre-work meeting with all stakeholders
- Written schedule posted in common areas
- Daily check-ins with facility managers
- Air quality monitoring in occupied zones
- Rapid response protocol for complaints
- Final air quality report before occupants return to work zones
The best projects we’ve worked on treated occupants as partners, not obstacles. That mindset changes everything.
On-Site Restoration Coordination Checklist for Every Phase
Dust-controlled restoration happens in phases. Each phase has specific coordination requirements. Use this checklist to stay on track.
Pre-Work Phase (1-2 weeks before)
- Assess the building type (occupied, vacant, commercial, residential)
- Identify dust sources and high-risk areas (HVAC returns, doorways, adjacent spaces)
- Select dust control methods based on work type and building conditions
- Order equipment and materials (barriers, misting systems, filters, respirators)
- Schedule pre-work meeting with occupants and facility managers
- Brief the crew on dust control plan and roles
- Verify all equipment is functional and tested
Setup Phase (day before work starts)
- Install containment barriers at all entry and exit points
- Seal HVAC returns in the work zone with plastic and tape
- Position air handlers and test negative pressure
- Place misting equipment and verify water supply
- Post signage and mark containment zones
- Confirm crew understands the containment system
- Test all dust monitoring equipment
Active Work Phase (daily)
- Start air handling system before any dust-generating work
- Apply moisture to dust sources before sanding or grinding
- Monitor air quality in occupied spaces every 2-4 hours
- Check containment barriers for tears or gaps
- Verify crew is wearing required respirators
- Document any air quality issues or complaints
- Adjust equipment or work schedule if dust levels rise
Closeout Phase (after work stops)
- Shut down air handling system last (after dust settles)
- Clean all surfaces inside containment with HEPA vacuum
- Remove barriers and dispose of contaminated materials
- Final air quality check in adjacent spaces
- Document results and provide report to building owner
- Verify occupants can safely return to work zones
This checklist works for drywall sanding, surface restoration, demolition, and most renovation work. Adjust timing based on project scope.
Containment and Pressure Management During Restoration
Containment stops dust at the source. Pressure management stops it from traveling. Together, they create a sealed environment where dust stays trapped.
Plastic sheeting and tape create the barrier. Use 6-mil polyethylene for walls and 4-mil for HVAC sealing. Overlap seams by at least 6 inches and tape with duct tape.
Negative pressure does the heavy lifting. An air handler with a HEPA filter pulls air out of the containment zone faster than air leaks in.
Sizing matters. For a typical drywall sanding job in a 400-square-foot room, you need an air handler rated for at least 2,000 CFM (cubic feet per minute).
Verify negative pressure daily. Use a simple manometer (a U-shaped tube with water or mercury) to check pressure difference. You want -0.02 to -0.05 inches of water column.
Position the intake and exhaust carefully. The intake should be in the center of the work zone, away from the exhaust.
Pressure management steps:
- Install containment barriers with full sealing
- Select air handler sized for the space and work type
- Position intake in work zone center
- Exhaust outside the building only
- Check pressure daily with a manometer
- Adjust fan speed if pressure drops below target
- Replace HEPA filters when they clog (usually every 50-100 hours)
Pressure management is the invisible part of dust control. It works because you can’t see it working. But it’s the most important piece.
Verification and Measurable Performance Standards
You can’t manage what you don’t measure. Verification and measurable performance standards tell you whether your dust control is actually working.
Air quality monitoring is the clearest measure. Use a portable dust monitor (sometimes called a particle counter) to measure airborne dust in occupied spaces. Standard construction dust limits are:
- Occupied spaces: under 150 micrograms per cubic meter (μg/m³)
- Work zones: no limit, but should be lower than adjacent spaces
- Final clearance: under 50 μg/m³ in all occupied areas
Test at multiple points: in the work zone, just outside containment, in adjacent rooms, and in HVAC returns. Morning and afternoon readings often differ because dust settles overnight.
Visual inspection confirms what the monitor finds. Walk the containment perimeter daily. Look for dust accumulation outside barriers, dust on surfaces in adjacent rooms, or dust settling on HVAC vents.
Pressure verification with a manometer tells you negative pressure is holding. Do this daily. A sudden pressure drop means a leak or a clogged filter.
Worker health is a performance measure too. If workers are coughing, their respirators don’t fit or dust levels are too high. Address it immediately.
Document everything. Record air quality readings, pressure checks, visual inspections, and any corrective actions. This creates a performance record that shows the project met dust control standards.
Performance standards checklist:
- Air quality readings in occupied spaces (daily)
- Pressure verification with manometer (daily)
- Visual inspection of containment (daily)
- Respirator fit checks for workers (before work starts)
- Filter replacement schedule (every 50-100 hours)
- Written log of all measurements and actions
- Final air quality clearance report (before occupants return)
Measurement takes time. It’s worth it. It’s the difference between hoping dust control works and knowing it does.
Strong on-site coordination for dust-controlled restoration protects your building, your team, and your reputation. If your next renovation is in an occupied building, get a consultation that covers dust control from day one. GET QUOTE
Frequently Asked Questions
How do you control dust during interior restoration work?
Effective dust control during interior restoration combines containment barriers, water misting systems, and mobile dust-suppression equipment. Seal work areas with plastic sheeting and tape, use negative air pressure to prevent dust migration, apply water spray or chemical suppressants to surfaces before cutting or sanding, and maintain continuous monitoring throughout the project. The goal is to prevent fugitive dust from reaching occupied spaces while keeping the work area safe for crews. Proper coordination ensures all methods work together rather than conflicting with each other.
What should a dust-control plan include for a restoration project?
A dust-control plan must specify equipment placement, water application schedules, barrier locations, and communication protocols. Include details on which surfaces require pre-treatment, how often misting systems operate, where dust collection happens, and how containment will be verified. The plan should also address traffic patterns on haul roads, procedures for moving materials without creating airborne dust, and contingency steps if dust levels exceed acceptable thresholds. Include schedules for barrier inspection and maintenance, and clearly identify who monitors compliance at each phase.
How can you keep dust from spreading between work areas in an occupied building?
Isolate the work area with sealed plastic barriers, use negative air pressure systems to pull air away from occupied spaces, and establish clean transition zones where workers change clothes or equipment. Install dust-collection equipment at the boundary between the work zone and occupied areas. Communicate with building occupants about work schedules so they can close doors and windows during high-dust activities. Regular inspections of barrier integrity prevent leaks. For drywall sanding or similar activities, schedule work during hours when fewer people occupy the building, and use water misting to suppress particles before they escape the containment area.
How often should dust barriers and work areas be checked during restoration?
Inspect barriers and containment systems at least twice daily: once at the start of work and once mid-shift. After high-dust activities like drywall sanding, check immediately to verify that moisture has settled particles and barriers remain intact. Weekly inspections should include pressure tests to confirm negative air systems are functioning, visual checks for tears or gaps in plastic sheeting, and verification that equipment placement hasn’t shifted. Document all inspections to demonstrate compliance and create a record if disputes arise about dust migration or air quality during the project.